Deployment Guide
About This Guide
This guide is a comprehensive deployment manual for healthcare professionals who handle DICOM images and want to build a DICOM image reception system on AWS. Even users who are new to AWS can follow the step-by-step instructions to deploy the solution.
Pre-Deployment Preparation
AWS Environment Setup
AWS Account Creation
Access AWS Official Website
Click “Create AWS Account”
Set email address, password, and account name
Enter contact information and payment details
Complete phone verification
Required IAM Permissions
You need an IAM user or role with the following permissions:
CloudFormation: Full access
ECS: Full access
Lambda: Full access
S3: Full access
VPC: Read permissions
IAM: Role creation permissions
Permission Setup Steps:
AWS Management Console → IAM
“Users” → “Add user”
Select “Attach existing policies directly”
Choose policies corresponding to the above permissions
Network Environment Preparation
Understanding VPC (Virtual Private Cloud)
VPC is a virtual private network created on AWS. Think of it as recreating your hospital’s internal network in the cloud.
Required Network Configuration
Public Subnets (2 or more)
Purpose: Areas accessible from the internet
Deployment: Network Load Balancer (receives external connections)
Requirement: Deploy in different Availability Zones (AZ)
Private Subnets (2 or more)
Purpose: Secure areas not directly accessible from outside
Deployment: DICOM processing servers (actual image processing)
Requirement: Deploy in different Availability Zones
NAT Gateway (Required)
Purpose: Allows servers in private subnets to access the internet
Why Required: DICOM processing servers need to download container images from ECR (Elastic Container Registry)
Deployment: At least one NAT Gateway in one public subnet
Critical: System will not start properly without NAT Gateway
How to Check Network Settings
AWS Management Console → VPC
Check existing VPC ID in “VPC” menu
Check public/private subnet IDs in “Subnets” menu
Check “NAT Gateways” menu to verify at least one NAT Gateway is deployed in a public subnet
Check access control settings in “Security Groups”
Security Requirements
Understanding Security Groups
Firewall functionality on AWS. Controls which IP addresses from within the VPC and from the internet can access which ports.
Security Group Configuration for DICOM Communication
VPC Internal Access Configuration Example:
Type: Custom TCP
Port: 11112 (standard DICOM port)
Source: 10.0.0.0/16 (VPC internal IP address range)
Description: VPC internal DICOM SCP connection
Internet Access Configuration Example:
Type: Custom TCP
Port: 11112 (standard DICOM port)
Source: 203.0.113.0/24 (hospital's global IP address range)
Description: Internet DICOM SCP connection
TLS Certificate (Optional)
What is TLS Certificate: Digital certificate for encrypting communications
When Required: When conducting DICOM communication over the internet
How to Obtain: Available free through AWS Certificate Manager (ACM)
Detailed Deployment Steps
Step 1: Subscribe on AWS Marketplace
Access AWS Marketplace
Log in to AWS Management Console
Navigate to AWS Marketplace
Search for StoreSCP
Enter “DICOM Store SCP for AWS HealthImaging” or “StoreSCP” in the search bar
Select the corresponding product
Click “View purchase options”
Subscribe
Review and accept terms by clicking “Accept Terms”
Wait for subscription processing to complete
Step 2: Configuration and Deployment
Navigate to Configuration
Click “Continue to Configuration”
Setup Configuration
Service: Select ECS
Version: Select the latest stable version
Click the link of Deployment templates
Step 3: CloudFormation Parameter Configuration
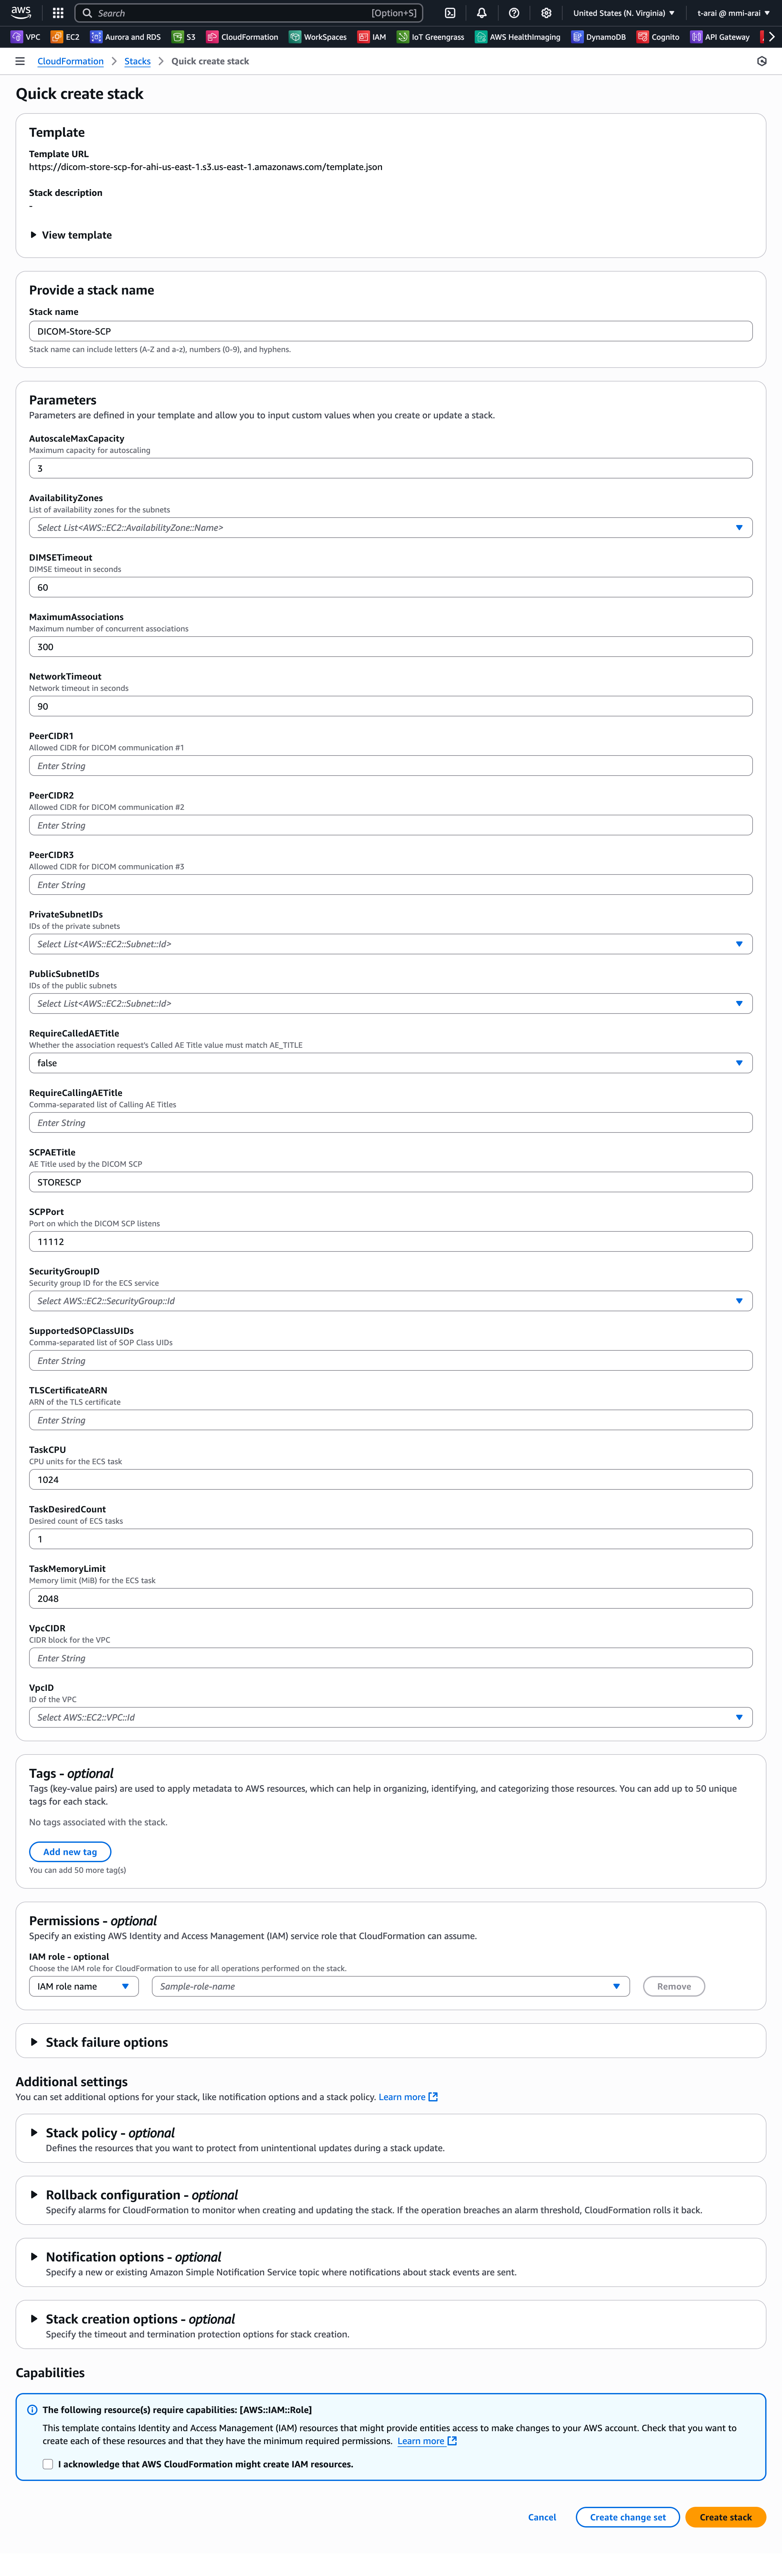
CloucFormation - Quick create stack
Required Parameters
Network Configuration
Parameter |
Description |
Example |
How to Check |
|---|---|---|---|
VpcID |
ID of the VPC to use |
vpc-xxxxxxxxx |
VPC Console → “VPCs” |
PublicSubnetIDs |
Public subnet IDs (comma-separated) |
subnet-xxxxxxxx,subnet-yyyyyyyy |
VPC Console → “Subnets” |
PrivateSubnetIDs |
Private subnet IDs (comma-separated) |
subnet-aaaaaaaa,subnet-bbbbbbbb |
VPC Console → “Subnets” |
SecurityGroupID |
Security group ID |
sg-xxxxxxxxx |
EC2 Console → “Security Groups” |
VpcCIDR |
VPC IP address range |
10.0.0.0/16 |
Check VPC details |
DICOM Configuration
Parameter |
Description |
Example |
Recommended Value |
|---|---|---|---|
SCPAETitle |
DICOM device identifier |
STORESCP |
Hospital abbreviation (max 16 chars) |
SCPPort |
DICOM communication port |
11112 |
Keep default value |
PeerCIDR1 |
Allowed IP address range 1 |
203.0.113.0/24 |
Hospital’s global IP range |
PeerCIDR2 |
Allowed IP address range 2 |
“” |
Additional IP range (optional) |
PeerCIDR3 |
Allowed IP address range 3 |
“” |
Additional IP range (optional) |
Step 4: Execute Deployment
Acknowledge Capabilities
Scroll down to the “Capabilities” section at the bottom of the page
Check the box “I acknowledge that AWS CloudFormation might create IAM resources.”
This is required because the template creates IAM roles and policies
CloudFormation Stack Creation
Click “Create stack”
Monitor stack creation progress
Deployment Completion Verification
Confirm stack status becomes “CREATE_COMPLETE”
Typically takes 10-15 minutes to complete
Post-Deployment Configuration
Retrieve Connection Information
After deployment completion, retrieve connection information using these steps:
AWS Management Console → CloudFormation
Select your created stack
Click the Outputs tab
Note the following information:
NetworkLoadBalancerDNS: PacsNLB-1234567890.elb.us-east-1.amazonaws.com
DICOMPort: 11112
DICOMAETitle: STORESCP
DICOM Device Configuration
Connection Settings Example
Host: PacsNLB-1234567890.elb.us-east-1.amazonaws.com
Port: 11112
Called AE Title: STORESCP
Calling AE Title: WORKSTATION1
Connection Testing
DICOM Echo Test
# Example using dcmtk
echoscu -v -aec STORESCP -aet WORKSTATION1 PacsNLB-1234567890.elb.us-east-1.amazonaws.com 11112